If you want to learn how to crochet for beginners, the easiest path is to start before the first stitch. A comfortable hook, a forgiving yarn, and a relaxed grip will make the whole process feel less mysterious and much more manageable. Crochet can look intricate from the outside, but the basics are simple once they are broken down in the right order.
This guide covers the essentials: how to choose a beginner-friendly hook and yarn, how to hold both comfortably, how to make a slip knot, chain stitch, single crochet, and double crochet, and how to avoid confusion when patterns use UK or US terminology. It finishes with a realistic first-week practice plan and simple fixes for the beginner problems that show up most often.
What you need to start crocheting
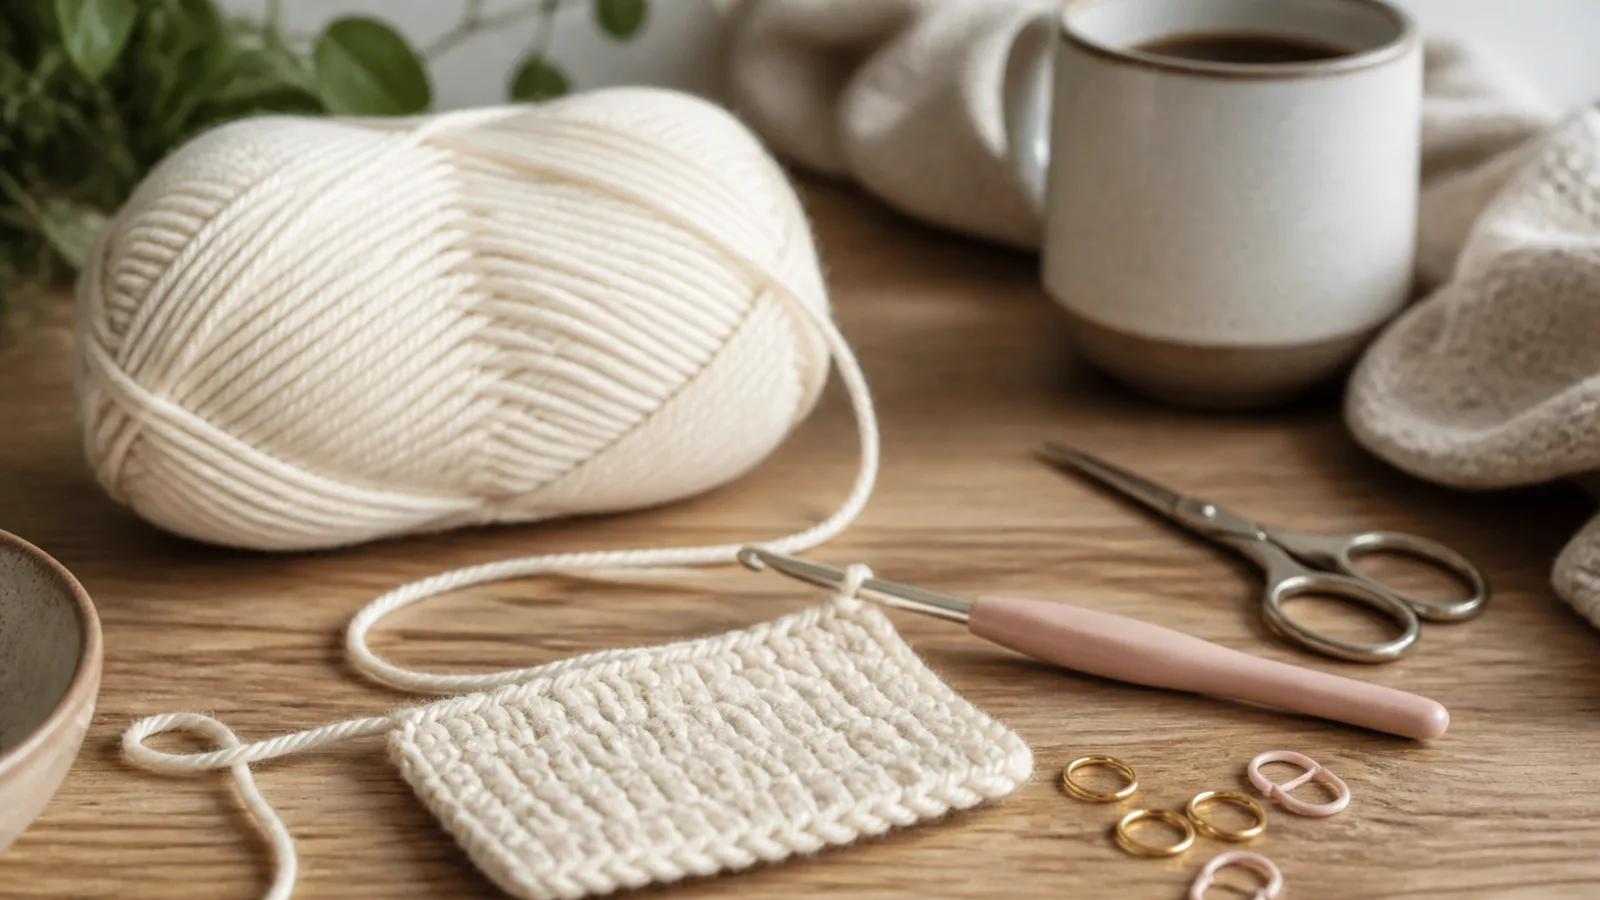
You do not need a lot of equipment to begin. In fact, too many choices can make starting feel harder than it should. A simple setup is enough: one hook, one skein of yarn, and a few small tools that help you keep track of what you are doing.
The best hook size for beginners
A medium-sized hook is usually the easiest place to begin. Very small hooks can feel fiddly, while very large hooks may be awkward if you are still learning how to control the yarn. A middle-of-the-road size gives you a better feel for the motion of the stitches and is often easier on the hands.
The exact size matters less than comfort at the start. If the hook feels slippery, too short, or uncomfortable in your hand, you are less likely to stick with it. Many beginners like an aluminum hook because it glides easily, while others prefer bamboo or an ergonomic handle for a softer grip. There is no single best material. The right one is the one you can use without tensing your hand.
If you are choosing from a yarn shop or online listing, do not get stuck trying to find the perfect hook. You are learning the motion, not building a final project yet. A common medium size is enough to get started.
Choosing forgiving yarn
Yarn choice can make the difference between a calm first experience and a frustrating one. The easiest yarns for beginners are smooth, medium-weight, and light in color. Light shades make it easier to see the stitches, which helps when you are trying to find the right place to insert your hook.
Fuzzy, dark, very slippery, or novelty yarns tend to hide the structure of the stitch. That can be fun later, but it is not helpful when you are still learning how a loop, chain, and row should look. Thin yarn or crochet thread can also be difficult because the stitches are smaller and less visible. On the other end, very chunky yarn can be harder to hold evenly if your hands are not used to the feel yet.
A simple way to shop is to look at the yarn label and find the weight category. Most beginner patterns work well with a medium weight yarn, often marked on the label in a way that makes it easy to spot. You do not need to memorize the system on day one; you just need yarn that is easy to see and comfortable to handle.
Two common beginner-friendly choices are acrylic and cotton:
- Acrylic is widely available and often affordable. It can be a good practice yarn because you will not mind using it for repeated swatches.
- Cotton has good stitch definition, which means the loops are easier to see. It can feel a little firmer and less stretchy than some other yarns, but that can actually help when you are learning.
If you are unsure, choose a smooth, light-colored medium-weight yarn and start there. The goal is to make the stitches visible and manageable, not to buy the most exciting yarn in the shop.
Other small tools that help
You can crochet with very little equipment, but a few extras make practice easier:
- Small scissors or yarn snips for cutting the yarn cleanly.
- A tapestry needle for weaving in ends when you finish a piece.
- Stitch markers or even safety pins to mark the ends of rows.
- A notebook or notes app to write down what hook size and yarn you used.
- A ruler or tape measure if you want to check your tension later.
None of these are essential on day one, but they do make the learning process smoother. If you are putting together a small beginner kit, those few tools are enough.
How to hold the hook and yarn comfortably
Before you make stitches, it helps to get comfortable with how the yarn and hook sit in your hands. Many beginners think they are doing something wrong when their hands feel awkward, but that usually just means they are still learning a new motion.
Two common hook grips
There are two common ways to hold a crochet hook: the knife grip and the pencil grip. Neither one is more correct than the other. The best choice is the one that feels natural and does not strain your hand.
- Knife grip: Hold the hook like a knife, with your hand over the top.
- Pencil grip: Hold the hook like a pencil, with the hook resting between your fingers.
Try both for a few minutes. Some people find one grip feels easier immediately; others switch depending on the project or how tired their hand feels. The main aim is control without stiffness.
Simple ways to tension yarn
“Tension” just means how the yarn is fed into your stitches. If the yarn is too loose, the loops may look uneven. If it is too tight, your stitches can become hard to work into. Beginners often hold the yarn too tightly because they are trying to control everything at once.
A useful approach is to wrap the yarn around your fingers in a way that feels steady but not strained. The yarn should glide through your hand, not fight against it. If your fingers feel clamped, loosen your grip a little. If the yarn slips around too much, adjust your hand position until it feels more secure.
Good tension is not about perfection. It is about creating loops that are consistent enough to work into, without making your hands ache. If your stitches look a little uneven at first, that is normal.
What good tension looks like
With comfortable tension, the loop on your hook should move easily without being forced. Your stitches should not look puckered or stretched out in an extreme way. The yarn should feed steadily as you work, and your hands should feel controlled rather than cramped.
If you catch yourself squeezing the hook tightly or pulling the yarn hard after every stitch, pause and reset. Beginners often improve quickly once they realize they can soften their grip.
Your first stitches: the foundation
Now that the tools are sorted, it is time to make stitches. Start with the simplest building blocks: the slip knot, chain stitch, single crochet, and double crochet. These four steps will give you the foundation for a huge number of beginner projects.
How to make a slip knot
The slip knot is usually the first loop you put on your hook. It gives you a starting point without being permanently fixed in place.
- Make a loop with the yarn, leaving a tail.
- Bring part of the yarn through the loop to form a second loop.
- Pull gently on the working yarn and the tail to tighten the knot.
- Slide the loop onto your hook.
It should be snug enough to stay on the hook, but loose enough to move. If it is too tight, you will struggle to start your first chain.
How to chain stitch
The chain stitch is the base of many crochet projects. It creates a row of linked loops that you can build on later. At first, it may feel like the most awkward part because you are learning how the hook and yarn work together.
To make a chain:
- Hold the slip knot on your hook.
- Bring the yarn over the hook.
- Pull that yarn through the loop already on the hook.
- Repeat to make more chains.
At first, do not worry about making a long chain. Make a short one, then stop and look at it. Notice that each chain is a little loop linked to the next. If the chain feels too tight, try loosening your fingers. If it twists as you work, slow down and keep the loops facing the same direction.
One common beginner problem is losing count. That is normal too. Counting out loud while you chain can help, especially in the beginning.
How to single crochet
Single crochet is one of the most useful beginner stitches because it is simple, sturdy, and appears in many projects. It is also a good stitch for practice because it helps you learn how to insert the hook into a stitch rather than working only with chains.
To make a single crochet:
- Insert the hook into the chain or stitch you are working into.
- Yarn over.
- Pull the yarn through the stitch. You now have two loops on the hook.
- Yarn over again.
- Pull through both loops on the hook.
If the motion feels slow and clumsy at first, that is fine. The goal is to understand the sequence. Once your hands learn it, the stitch becomes much smoother. Single crochet produces a fairly dense fabric, which makes it useful for washcloths, toys, and many simple shapes.
How to double crochet
Double crochet is taller and more open than single crochet. It is a very common stitch, but the name changes depending on whether a pattern uses UK or US terminology, which is why it helps to learn the difference early.
In US terms, this stitch is called double crochet. In UK terms, the same basic stitch is called treble crochet. That difference matters when you follow patterns, so always check which system the pattern uses.
To make a US double crochet:
- Yarn over first.
- Insert the hook into the stitch.
- Yarn over and pull through. You now have three loops on the hook.
- Yarn over and pull through two loops.
- Yarn over again and pull through the last two loops.
The extra yarn-over at the start is what makes the stitch taller than single crochet. Because it creates more height, double crochet can work up faster and produce a softer, more open fabric. That makes it useful for scarves, blankets, and many easy patterns once you feel comfortable with the basics.
How to crochet for beginners: UK vs US terms
One of the biggest sources of confusion for new crocheters is the difference between UK and US pattern language. The stitches are not always named the same way, even when the movement is similar. That can make a simple pattern look intimidating if you are reading it in the wrong system.
The good news is that the system is easy to check once you know what to look for. Most patterns will say whether they use UK or US terms near the beginning, often in the abbreviations or notes section. If they do not, it is worth checking the source carefully before you start.
Why the names change
UK and US crochet terms evolved differently, so the same stitch can have a different name depending on where the pattern comes from. That is why a pattern written in one system may seem to call for a stitch you have never learned, even when the motion is familiar.
You do not need to memorize every term at once. Start with the stitches in this guide and keep a simple translation in mind.
Beginner translation guide
- Chain = chain in both UK and US terms.
- Single crochet (US) = double crochet (UK).
- Double crochet (US) = treble crochet (UK).
If you are following a pattern from a website, book, or video, check the terminology before you begin and look for the abbreviations or notes section at the top. The Craft Yarn Council is a helpful reference point for stitch names and basic crochet standards if you want to compare terminology.
A simple rule: never assume “double crochet” means the same thing everywhere. Always look at the pattern’s notes first.
How to crochet for beginners without getting discouraged
Most beginners improve faster when they keep practice short and focused. You do not need a marathon session. A few short sessions across the week are usually better than one long, exhausting attempt.
Day 1–2: learn the hold and chain
Spend the first two days getting used to the hook, yarn, and slip knot. Make short chains and focus on the feel of the motion rather than the result. If your chain is uneven, that is normal. What matters most is that you are learning how the yarn moves through your hand.
Try to notice whether your grip gets tighter as you work. If it does, stop, shake out your hands, and start again more slowly. Short, relaxed practice is more useful than forcing your way through discomfort.
Day 3–4: add single crochet
Once the chain feels less awkward, practice single crochet into a short chain. Work slowly and count your stitches if that helps. Making a small square or swatch is a good goal because it gives you enough repetition to see a pattern without feeling like you need to finish a full project.
At this stage, do not worry if your rows are not perfectly even. You are building muscle memory. If a stitch gets missed, you will learn to spot it more easily next time.
Day 5–7: repeat and observe
By the end of the week, start noticing what changes from row to row. Does your tension feel looser? Are the stitches easier to see? Are your edges becoming more even? Small improvements matter.
This is also a good time to make a second practice square and compare it with the first one. Most beginners can see progress surprisingly quickly when they look at two swatches side by side.
A realistic goal for week one
Your first-week goal is not a finished blanket, scarf, or garment. It is to understand the motions and make a small practice piece without stress. That may sound modest, but it is exactly the kind of progress that leads to better projects later.
If you can chain, make a few rows of single crochet, and read a basic pattern note about UK or US terms, you are off to a strong start.
Fixes for the most common beginner problems
Almost every new crocheter runs into the same issues at first. The good news is that most of them are easy to fix once you know what is causing them.
Wobbly edges
Uneven edges usually come from missing stitches, adding extra stitches by accident, or turning your work inconsistently at the end of each row. This is very common when you are still learning to see where the stitches are.
To help, count your stitches at the end of each row. Stitch markers can also be useful for marking the first and last stitch in a row. If your edges keep changing shape, slow down and make sure you are working into the correct stitch each time.
Tight chains
If your foundation chain is too tight, it can be difficult to work into later. This often happens when you hold the yarn too firmly or use a hook that feels a little small for your hand.
Try loosening your grip slightly and making the chain more gently. Some beginners also find it easier to use a hook that is one size larger for the foundation chain, then switch to the size the pattern suggests for the rest of the project. If you are unsure, practice a few chains before starting the project so your hands can settle into the motion.
Splitting yarn
Yarn splitting happens when the hook catches only part of the strand instead of the whole loop. It can make the stitch look messy and slow you down. This is more common with fuzzy yarns or when you are working quickly.
To reduce splitting, use a smoother yarn and watch exactly where the hook enters the stitch. Slowing down for a few rows often helps more than people expect.
Sore hands
If your hands ache, that is a sign to pause, not push through. Beginners often grip the hook too tightly because they are concentrating so hard. Shorter practice sessions, breaks, and a lighter grip can make a big difference.
If a hook feels uncomfortable after just a few minutes, try a different style. Ergonomic handles can help some people, while others prefer a slimmer hook. There is no harm in experimenting until your hands feel better.
The best beginner progress usually comes from short, repeated practice rather than forcing long sessions. When your hands stay relaxed, the stitches get clearer faster.
What to make after your first practice swatch
Once you can make a basic chain and a few rows of crochet, choose a very simple project with straight edges. Flat, rectangular pieces are ideal because they do not require shaping, joining, or complex counting.
- Washcloth: good for practicing even rows and a simple stitch pattern.
- Scarf: useful if you want a longer project made from repeated stitches.
- Bookmark: a small project that is easy to finish and gives quick feedback.
The main advantage of these projects is that they let you repeat the same stitches enough times to improve without feeling overwhelmed. You will learn how your tension changes over time and how to keep your edges straighter.
If you are tempted to jump into a complex cardigan or amigurumi toy, that can wait. Build confidence first. Crochet becomes much more enjoyable when you know what your hands are doing.
Conclusion
Learning how to crochet for beginners is much easier when you start with the basics that most guides rush past: choosing a comfortable hook, picking a forgiving yarn, holding everything in a relaxed way, and learning the chain, single crochet, and double crochet at a slow pace. Once you understand the UK versus US terms and know how to fix wobbly edges or tight chains, you will have a solid foundation for almost any beginner project.
Keep your first week simple, practice in short sessions, and expect a little awkwardness at the beginning. That is part of the process. With a bit of repetition, the motions become familiar, and the stitches start to make sense.
FAQ
What is the easiest crochet stitch for beginners?
Single crochet is often the easiest useful stitch for beginners because it is simple, sturdy, and widely used. Chain stitch comes first as a foundation, but single crochet is usually the first real fabric stitch people learn.
What size hook should a beginner use?
A medium-sized hook is usually the easiest place to start. It is easier to control than very small or very large hooks, and it works well with common beginner yarns. Comfort matters more than choosing a perfect size on day one.
Is it better to learn crochet with light or dark yarn?
Light-colored yarn is usually better for beginners because the stitches are easier to see. Dark yarn can hide the loops and make it harder to know where to insert the hook.
What is the difference between UK and US crochet terms?
Some stitch names are different depending on the pattern system. For example, a US single crochet is a UK double crochet, and a US double crochet is a UK treble crochet. Always check whether a pattern uses UK or US terms before you begin.
Why do my crochet edges keep getting wavy or uneven?
Uneven edges often happen when stitches are missed or added by mistake, or when rows are turned inconsistently. Counting stitches, using stitch markers, and slowing down at the ends of rows can help a lot.
Join the conversation
Sign in — Sign in to join the conversation.