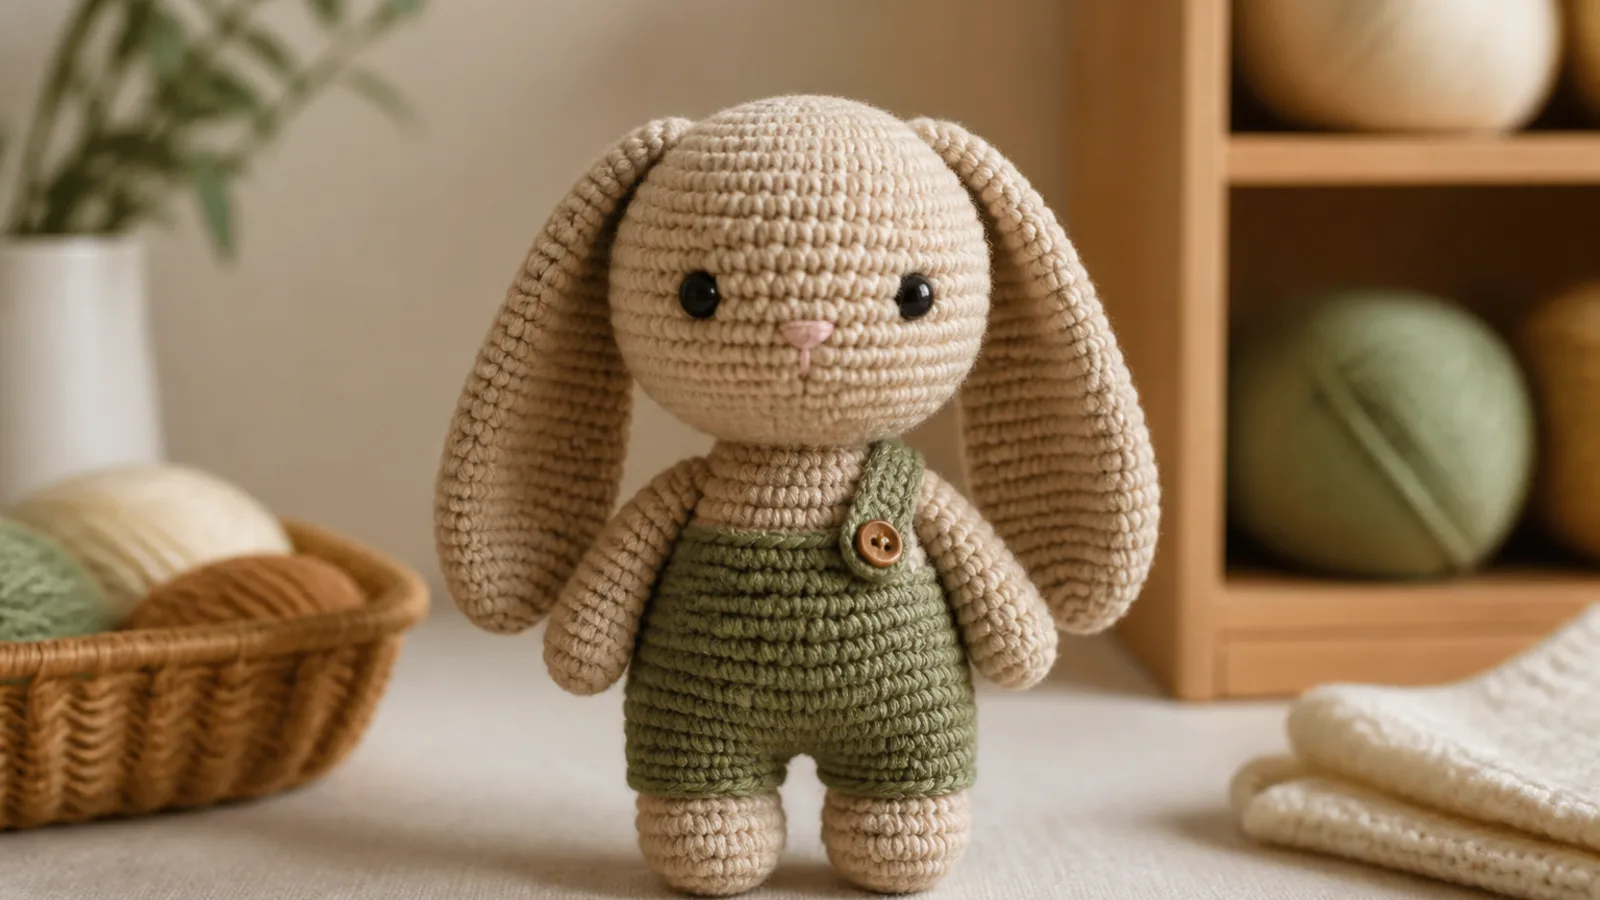
Most amigurumi projects look charming in the making, but the difference between “cute handmade” and “clean, polished finish” usually shows up at the end. If you want to know how to stuff and assemble amigurumi so it looks smoother, sits better, and holds its shape, the finishing stage is where the real transformation happens.
This is the part that many beginner guides rush past. Yet it’s also where small choices matter most: how firmly to stuff, where to place safety eyes, how to attach limbs without bulky joins, and how to hide yarn tails so the whole toy feels intentional. The good news is that none of it requires special tools or advanced skills. It just takes a bit of patience and a few reliable habits.
What makes amigurumi look neat instead of lumpy
Amigurumi usually looks professional when the shape is balanced, the features are aligned, and the seams disappear into the design. You do not need perfection. You do need consistency.
Three things make the biggest difference:
- Even stuffing so the toy keeps its shape without bulging.
- Careful placement so eyes, limbs, and ears sit symmetrically.
- Clean assembly so joins blend in instead of looking tacked on.
The exact result depends on yarn weight, hook size, stitch tension, and the pattern itself. A plush toy made with chenille yarn, for example, will behave differently from one made with cotton. But the same finishing principles still apply.
Choosing the right stuffing
What to use
The most common stuffing for amigurumi is polyester fiberfill. It’s light, soft, washable, and easy to shape as you work. For most toys, it’s the simplest all-purpose choice.
Some makers use scraps of yarn or fabric, but these can create lumps or make the toy heavy and uneven. They can also shift over time. If you use them, it’s usually best for small accents or weighted sections rather than the whole toy.
If your pattern calls for a seated toy or a figure that needs extra stability, you can add a little weight in the base. Even then, keep the overall feel soft and balanced. The aim is support, not heaviness.
How much to stuff
The simplest rule is: stuff firmly enough that the toy holds its shape, but not so tightly that the stitches stretch and the stuffing shows through. Most amigurumi benefits from a springy feel rather than a rigid one, unless the pattern specifically calls for a firmer structure.
A well-stuffed amigurumi should feel springy, not hard. If you press it gently, it should give a little and then bounce back. If it feels rock-solid, it may be overstuffed. If it collapses easily or looks wrinkled, it probably needs more filling.
Some parts benefit from different levels of firmness:
- Heads often need slightly firmer stuffing so the face stays smooth and rounded.
- Bodies should usually be firm but not packed tight.
- Arms and legs can be lightly to moderately stuffed, depending on whether you want them floppy or structured.
- Ears, tails, and small details may need only a little stuffing, or none at all.
If you’re unsure, stop a little earlier than you think and test the shape. It’s easier to add more stuffing than to remove it from a closed piece.
How to stuff without lumps
The trick is to add stuffing in small tufts rather than one large chunk. Pull the fiberfill apart a little before inserting it, then tuck it into the toy in layers.
Use the end of a crochet hook, a chopstick, or a stuffing tool to reach the tips of arms, legs, and heads. Push the stuffing into corners first, then fill the middle. That helps avoid hollow spots near the edges and dense clumps in the center.
As you go, smooth the outside with your fingers. Rotate the piece and look at it from several angles. If one side looks flatter or wider, adjust the stuffing before closing it.
“The best time to fix the shape is before the last seam is closed. Once the opening is sewn shut, the toy is much harder to correct cleanly.”
Getting symmetry right before you close the piece
Symmetry matters because even a very sweet toy can look unfinished if the eyes are off-centre or one side is fuller than the other. Before you seal anything permanently, take a moment to check the proportions.
Hold the piece at eye level and compare both sides. Then turn it and look again from the top and bottom. You’re checking not just the shape, but the balance. Is one side heavier? Is the head tilting? Are the feet sitting evenly?
If your pattern has clearly defined rounds, count carefully as you work so attachment points line up. Stitch markers are useful here, especially for ears, eyes, arms, and legs. Marking the same round on both sides helps keep everything balanced.
Common problem areas include:
- Bulging cheeks from stuffing placed too close to the front.
- Uneven feet that make the toy lean.
- A twisted head if the join is off-centre.
- One arm higher than the other because the placement was judged by eye alone.
If something looks wrong now, fix it now. A few minutes spent adjusting stuffing or repositioning a limb can save you from living with a flaw that will stand out forever.
Safety eyes and embroidered faces
When safety eyes are appropriate
Safety eyes can give amigurumi a crisp, polished look, but they are not the right choice for every toy. They’re best used when the finished item is for display or for an older child, depending on the pattern and the maker’s safety judgment.
They must be fitted before the head is fully closed, because the washer goes on the inside. Once locked in place, they are difficult to remove without damage.
To place them evenly:
- Mark the intended positions lightly with pins or removable markers.
- Check the spacing from the front, not just from the top.
- Step back and look at the toy from arm’s length.
- Confirm that both eyes are on the same horizontal line before fastening them.
If the eyes look right from one angle but wrong from another, trust the view from the front. That is what most people will notice first.
Child-safety trade-offs
For babies and toddlers, embroidered features are usually the safer option. Safety eyes and other small parts can become a choking hazard if they loosen or break away. That’s why many makers choose embroidery for toys intended for very young children.
This is one of those areas where there is no one-size-fits-all answer. If you’re making a toy for a child, it is wisest to choose the most secure option available and to follow local guidance on toy safety and age suitability. For official information on toy safety in the US and Europe, see the U.S. Consumer Product Safety Commission and the European Commission toy safety page.
Embroidery can be just as charming as safety eyes when done cleanly. A simple stitched eye or a small mouth can give the toy a soft, handmade expression without adding detachable parts.
How to embroider a face neatly
Before you stitch, decide on the expression. A tiny face can change the whole personality of the toy, so it helps to pause and test the placement with a removable marker or pins.
Use simple stitches such as:
- Straight stitch for small eyes or nose details.
- Backstitch for outlines or brows.
- Satin stitch for a denser, filled-in eye or nose.
Keep your tension even. If you pull too tightly, the fabric may pucker. If the tension is too loose, the embroidery can look messy or uneven. Work slowly, and anchor the thread securely inside the head so nothing shows on the outside.
If you want a very tidy finish, embroider the face before the final stuffing is packed in completely. That can make it easier to reach the right spots and keep the surface smooth.
Invisible joins and clean assembly
Once the pieces are stuffed and ready, assembly is what makes the toy feel complete. A good join should feel secure and look as discreet as possible.
How to attach limbs neatly
The cleanest method is usually to align the piece carefully and sew through matching stitches so the seam disappears into the join. You’re not trying to create a visible ridge. You’re trying to make the attachment look like part of the original shape.
Before sewing, pin or hold the limb in place and check it from the front and side. Compare both arms or both legs if there’s a pair. Small differences are easier to correct at this stage than after several rounds of stitching.
Work in small passes rather than pulling the thread tight all at once. Tight stitching can distort the body or make the limb sit awkwardly. A controlled, gradual join is usually neater and stronger.
This is especially useful for:
- Arms that need to hang naturally.
- Legs that need to support the toy evenly.
- Ears that should match in angle and height.
- Tails that need to sit flush against the body.
Attaching the head securely
The head is often the most visible part of the toy, so its placement matters more than almost anything else. If it tilts too far forward, the toy can look sleepy or unstable. If it sits too high, the neck may appear awkward. The goal is a natural, balanced angle.
Before you sew, place the head on the body and step back. Does it feel centered? Does the toy sit upright? Does the head lean in a way that suits the character? If something looks off, adjust the stuffing underneath or shift the position slightly.
For some patterns, especially those with narrow necks, a firmer stuffing base in the head and upper body can help the toy stand neatly. If the head still feels wobbly, reinforce the join with extra stitches rather than pulling harder on the existing thread.
Joining pieces without bulky seams
Bulky joins usually happen when the seam is sewn too tightly, too loosely, or with too much thread visible. Matching yarn helps a lot here, but technique matters just as much.
Keep the final tail long enough to secure properly, then weave it into the body. Avoid tying obvious knots on the outside. If the pattern allows it, hide the end by bringing it through the center of the stuffing and back out through a few stitches before trimming.
That little bit of extra effort pays off. Clean joins make the whole toy look more refined, even if the construction is simple.
Hiding yarn tails and finishing neatly
Loose ends are one of the fastest ways to make a project look unfinished. The good news is that they’re also one of the easiest things to fix well.
To weave in an end, thread it through several stitches on the inside of the toy, then change direction once or twice before trimming. That gives the yarn more grip. If the end is secure, you should not see it from the outside and it should not work itself loose when the toy is handled.
When you change colours, join new yarn neatly from the beginning rather than leaving bulky knots. If the pattern creates visible colour changes, try to position the joins where they are least likely to show.
After all the weaving is done, give the toy a final cleanup:
- Massage the stuffing into a smooth shape.
- Trim stray fuzz carefully.
- Check that all limbs and features are secure.
- Look for any gaps or loose ends from every angle.
A final 360-degree check is worth it. Turn the toy in your hands and inspect the front, sides, back, top, and underside. It’s the easiest way to catch tiny problems before you gift or display the piece.
Troubleshooting common finishing mistakes
Even experienced makers end up with the occasional lumpy head or slightly crooked eye placement. The important thing is knowing what to look for.
If the toy feels too hard: it may be overstuffed. The stitches can stretch, especially in lighter yarns. If possible, remove a little stuffing before the opening is fully closed.
If the toy sags or slouches: it likely needs more support. Add stuffing in small amounts, concentrating on the areas that need shape, such as the head or base.
If the eyes look uneven: check whether the markers were placed on the same round and same spacing. If the eyes are not yet locked in, reposition them before closing the head.
If the limbs wobble: the join may be too loose or too shallow. Reinforce the seam and make sure the attachment point matches on both sides.
If the face seems off-centre: it’s often better to remove the feature and redo it early than to keep a detail you’ll always notice. A small correction now can save the whole toy’s appearance.
Practical finish checklist
Before you call a project done, run through this simple checklist:
- Stuff in small amounts and check the shape as you go.
- Make the toy firm, but not so tight that the stitches stretch.
- Check symmetry from the front and from the side.
- Place safety eyes before closing the head.
- Use embroidered features for babies and toddlers.
- Attach limbs and ears slowly so the joins stay neat.
- Weave in every tail securely.
- Inspect the finished toy for loose ends, gaps, or uneven placement.
If you want a more durable toy, do a gentle tug test on the joins and features before gifting it. That’s especially important for anything meant for children.
FAQ
How firm should amigurumi stuffing be?
Firm enough that the toy holds its shape, but not so firm that the stitches stretch or the surface feels hard. A good stuffed amigurumi should feel springy and smooth, with no obvious lumps.
Can I use embroidery instead of safety eyes?
Yes. Embroidered eyes are a great option for babies, toddlers, and anyone you want to avoid small parts for. They can also give the toy a softer, more handmade expression.
When should I attach safety eyes in an amigurumi project?
Before the head is fully closed. The eyes need to go in while you still have access to the inside so the washers can be secured properly.
What is the neatest way to sew on arms and legs?
Pin or hold each piece in position first, check symmetry from the front, then sew through matching stitches in small passes. Keeping the tension steady helps the join stay flat and discreet.
How do I stop stuffing from showing through my stitches?
Use less stuffing, or distribute it more evenly so the fabric isn’t stretched too tightly. In many cases, the issue comes from overstuffing rather than the yarn itself.
If you focus on the finishing stage, your amigurumi will immediately look more polished. Learning how to stuff and assemble amigurumi is less about being fussy and more about giving the toy the shape, balance, and clean lines it needs to look intentional. A careful final pass can turn a nice handmade piece into one that feels truly finished.
Join the conversation
Sign in — Sign in to join the conversation.