
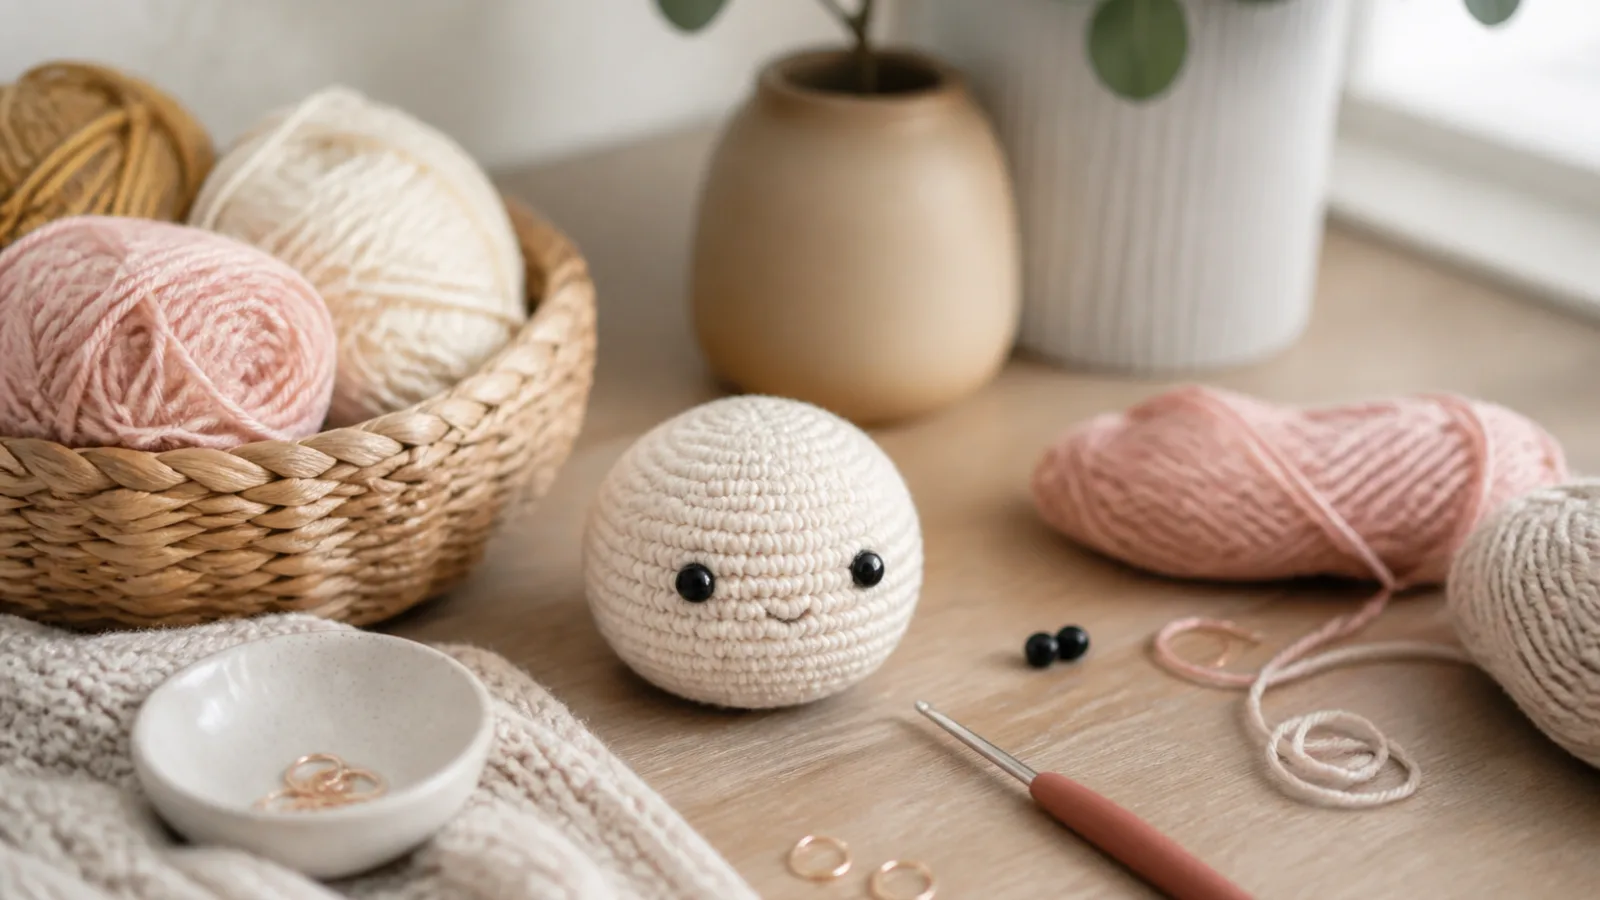
Your first crochet toy does not need to be tiny, perfect or packed with details. The best approach to amigurumi for beginners is to make one simple rounded character from start to finish, so you learn how the whole thing works: yarn, hook size, the magic ring, spiral rounds, stuffing, eyes and shaping.
This guide walks you through a palm-sized pocket creature you can turn into a chick, bear, bunny or cheerful blob friend with small face changes. More importantly, it shows you how to fix the problems that make beginners want to quit: visible stuffing, wonky shapes, lost rounds, slipping markers and lumpy filling.
What Is Amigurumi?
Amigurumi is the craft of making small stuffed toys with crochet or knitting. Most modern amigurumi patterns are crocheted tightly in the round, using increases and decreases to create spheres, ovals, limbs and tiny details.
If you have crocheted scarves or granny squares before, amigurumi can feel different. You usually work in a continuous spiral instead of joined rows, and you use a smaller hook than the yarn label suggests because the fabric needs to be dense enough to hold stuffing.
One quick note for UK and Australian readers: many amigurumi patterns use US crochet terms. In US terms, the main stitch is usually single crochet. In UK terms, this is called double crochet. Always check the pattern’s terminology before you begin.
Amigurumi for Beginners: The Best First Project
For a first toy, choose a simple round body with a face. Think of it as a tiny stuffed ball with personality. Make it yellow with an embroidered beak, brown with bear ears, white with bunny ears, or any colour you like for a little desk companion.
This project teaches the core skills used in many crochet toys:
- Starting with a magic ring, or an easier chain alternative.
- Working in continuous spiral rounds.
- Increasing to make the shape wider.
- Crocheting even rounds to build height.
- Using invisible decreases to close the top neatly.
- Stuffing firmly without stretching the stitches.
- Adding a face safely and securely.
Keep the first version plain. A finished simple toy teaches more than a complicated project that sits half-done in a basket.
Supplies You Need
Yarn
Start with a smooth, light-coloured medium-weight yarn. In the US this is often called worsted or medium weight; in the UK and Australia, aran is a common equivalent. Exact labels vary by brand, so focus on how the yarn feels: smooth, not too thin, and easy to see.
Cotton gives crisp stitch definition, which can help you learn where to insert the hook. Acrylic is often softer and more forgiving. Either can work well for a first toy.
Avoid very dark yarn, fluffy yarn, eyelash yarn and plush chenille for your first attempt. They can make stitches hard to see, and plush yarn is less forgiving if you need to pull stitches out.
Hook Size
Amigurumi usually needs a smaller hook than the yarn label recommends. This creates a tighter fabric so the stuffing does not show through.
As a practical starting point, if your medium-weight yarn label suggests around a 5 mm hook, try a 3.5 mm or 3.75 mm hook for amigurumi. If your stitches are leaving visible holes, try going down slightly. If the hook is hard to insert, the yarn splits badly or your wrist feels strained, move up slightly. Your tension matters as much as the number on the hook.
Stuffing
Use toy stuffing or fibre fill. The trick is to add it in small tufts, not one large clump. Pull the stuffing apart with your fingers first so it becomes airy and cloud-like, then build the shape gradually.
Eyes and Face Details
Plastic safety eyes are popular for amigurumi, but the name can be misleading. They are not the safest choice for babies, toddlers or pets, because small parts can become choking hazards if they detach. For toys that may be chewed, pulled or slept with, embroidered eyes are the better option.
For a shelf decoration or an adult’s desk companion, safety eyes may be suitable if attached correctly. Place them before the opening becomes too small, and check the position carefully before pressing on the backs, because they are not designed to be removed.
Other Tools
- A locking stitch marker.
- A tapestry needle for closing and weaving in ends.
- Scissors.
- Pins, if you are adding ears or other pieces.
- A row counter, notebook or phone note for tracking rounds.
A locking stitch marker is especially helpful. Loose rings and yarn scraps can work, but they slip out more easily when you are handling a small toy.
The Four Skills This Toy Uses
Magic Ring
The magic ring creates a neat, adjustable centre with very little hole. You crochet your first stitches into the loop, then pull the yarn tail to close it.
If the magic ring feels too fiddly, use this beginner alternative: chain 2, then work your first round into the second chain from the hook. It may leave a slightly more visible centre, but it is perfectly fine for a first toy.
Single Crochet
Most beginner amigurumi uses single crochet in US terms, or double crochet in UK terms. It creates a compact stitch that forms a firm fabric.
For neat amigurumi, try to keep your tension steady rather than tight. Tight stitches can look tidy, but they can also be hard to work into and tiring for your hands.
Increases
An increase usually means making two stitches into one stitch. Increases make your circle grow wider. For a round toy, they are often spaced evenly around the round.
Invisible Decreases
A decrease turns two stitches into one. An invisible decrease is smoother than a standard decrease and is especially useful when closing a stuffed shape.
To make one, insert your hook into the front loop only of the next stitch, then into the front loop only of the following stitch. Yarn over and pull through both front loops, then finish the single crochet. It takes practice, but it helps reduce gaps near the top of the toy.
Step-by-Step Pattern: Make Your First Round Toy
This tiny pattern makes a simple round body. Use US single crochet terms. If you use UK terminology, read sc as dc. Work in a continuous spiral and do not join rounds unless you prefer a visible seam.
Basic pattern:
- Rnd 1: 6 sc in magic ring. [6]
- Rnd 2: inc in each stitch around. [12]
- Rnd 3: (sc, inc) 6 times. [18]
- Rnd 4: (2 sc, inc) 6 times. [24]
- Rnd 5: sc in each stitch around. [24]
- Rnd 6: sc in each stitch around. [24]
- Rnd 7: sc in each stitch around. [24]
- Rnd 8: sc in each stitch around. [24]
- Rnd 9: (2 sc, inv dec) 6 times. [18]
- Rnd 10: (sc, inv dec) 6 times. [12]
- Rnd 11: inv dec 6 times. [6]
- Fasten off, weave through the front loops of the remaining stitches and pull gently to close.
If using safety eyes for a decoration, place them before decreasing too far, usually between Rnds 6 and 7, about 5 stitches apart. For a child’s toy, embroider the eyes instead.
Step 1: Start the Centre
Make a magic ring and crochet 6 single crochet stitches into it. Pull the ring closed and place a stitch marker in the first stitch of the round.
From this point on, you will work in a spiral. That means you do not join with a slip stitch at the end of each round.
Step 2: Increase Into a Flat Circle
Rounds 2 to 4 make the base wider. Your piece should look like a small, neat circle at this stage. If it is slightly flat, that is normal. The toy becomes rounded once you work the sides and add stuffing.
Step 3: Work Even Rounds
Rounds 5 to 8 build the sides and turn the flat circle into a cup shape. Move your stitch marker up at the beginning of every round. If you forget, stop and count before continuing.
The Right Side Face-Check
A very common beginner mistake is accidentally working the toy inside out. As your piece curls, make sure the neat vertical V-shaped stitches are on the outside and the starting yarn tail sits inside the hollow body. Your hook should enter from the outside of the toy toward the hollow centre, not from the inside outward.
If the outside looks more like horizontal bars than clean V stitches, gently turn the cup the other way before continuing. This also makes invisible decreases easier later.
Step 4: Add the Face
Add safety eyes before the opening becomes too small and before you finish stuffing. Look at the face from the front and side before attaching the washers. Eyes placed a few rounds below the widest part often give a balanced, cute expression.
If you are embroidering the face, use embroidery thread, cotton yarn or a smooth scrap yarn. Keep the tension gentle. Pulling too tightly can pucker the fabric and change the expression.
If the toy is for a baby, toddler or pet, embroider the eyes and avoid small detachable pieces.
Step 5: Stuff the Body
Start stuffing when the body is partly closed but still easy to access. Add small tufts, pushing them toward the outer edges first and then filling the centre.
A good stuffed toy feels firm but not stretched. If the stitches open up and stuffing shows, remove a little stuffing or use a smaller hook next time. If the toy collapses or dents, add more stuffing in small amounts.
Step 6: Decrease to Close
Use invisible decreases as the shape narrows. Pause before the hole gets too small and add the last bit of stuffing. This is your final chance to smooth the sides and correct flat or hollow spots.
Avoid yanking the yarn during decreases. Over-tightening can create points or puckers. Smooth, steady tension is better.
Step 7: Close the Final Hole
When only a small opening remains, cut the yarn, leaving a tail. Thread it onto a tapestry needle. Weave the needle through the front loops of the remaining stitches, then pull gently to close the hole.
Pass the needle through the body and bring it out somewhere else. Tug lightly, trim the yarn close to the surface, and let the end disappear inside.
Step 8: Add Optional Details
If you want ears, a tail or a tiny beak, keep them simple. Small triangles can become ears. A few straight stitches can become a beak or mouth. Two small pink stitches can suggest cheeks.
Any sewn-on piece should be attached securely, especially if the toy will be handled often. For a first project, details are optional. A simple face can be just as charming.
How to Read a Simple Amigurumi Pattern
Beginner patterns often look like a code at first. These are the abbreviations you are most likely to see:
- MR: magic ring.
- sc: single crochet in US terms.
- inc: increase, usually two stitches in one stitch.
- dec: decrease.
- inv dec: invisible decrease.
- st or sts: stitch or stitches.
- rnd: round.
If a pattern says, Rnd 3: (sc, inc) around [18], it means you repeat one single crochet, then one increase, until you finish the round. The number in brackets is the stitch count you should have at the end.
Those final stitch counts are not decoration. They are your best tool for catching mistakes before the shape goes off track.
Common Beginner Mistakes and Easy Fixes
Holes Show and Stuffing Peeks Through
This usually happens because the hook is too large, the tension is loose, the toy is overstuffed, or the decreases are leaving gaps.
- Try a smaller hook on your next piece.
- Use invisible decreases near the closing rounds.
- Add stuffing gradually instead of packing it in firmly all at once.
- If gaps appear only near the top, focus on your decreases and stuffing rather than blaming the whole project.
The Shape Looks Lopsided
A lopsided toy often means you added or missed stitches, changed tension, or pushed more stuffing to one side.
Count stitches at the end of each round until the pattern feels familiar. If the toy is already finished, massage the stuffing gently between your hands. Small asymmetry is normal in handmade toys and often adds character.
The Bottom Is Flat or Wavy
A slightly flat base can be useful if you want the toy to sit upright. But strong rippling usually means there are too many increases, while early cupping can mean too few increases or tight tension.
Check the stitch count and compare your rounds to the pattern. If the mistake is early and dramatic, it may be worth restarting. If it is minor, keep going and see how the shape looks after stuffing.
You Keep Losing Count
Spiral rounds do not have an obvious seam, so counting is part of the craft. Put a locking marker in the first stitch of each round, and move it as soon as you make the first stitch of the next round.
If you are interrupted mid-round, count from the stitch after your marker to the loop on your hook. Learn to spot increases: they look like two V-shaped stitches growing from the same base stitch. If your pattern says you should repeat one single crochet and one increase, you can check whether the pairs are lining up as you count.
Use a written tally too. Something as simple as R1, R2, R3 with a tick beside each completed round can prevent a lot of frustration.
Your Stitch Marker Slips Out
Use a locking marker rather than a loose ring. Place it through both loops of the stitch so it stays put. Choose a contrasting colour so you can find it quickly.
Another option is a running marker: lay a strand of contrasting yarn across your work at the first stitch of each round, then flip it back and forth as you build the spiral.
The Stuffing Looks Lumpy
Lumpy stuffing usually comes from using one large piece. Pull the stuffing apart first, then add it in small clouds. Push it gently toward the edges, then fill the centre.
You can use the blunt end of a crochet hook to nudge stuffing into place, but do it gently. Forcing it can stretch stitches or push fibres through the fabric.
The Magic Ring Comes Loose
Leave a longer starting tail and weave it securely on the inside of the toy. With slippery yarn, weave in more than one direction. If the magic ring keeps failing, use the chain-2 method until you feel more confident.
When to Start Over and When to Keep Going
Restart if your stitch count is far off in the first few rounds, if there are large gaps across the entire fabric, or if safety eyes have been locked into the wrong position and the toy cannot be corrected safely.
Keep going if the shape is a little uneven, one round is slightly tighter than the others, or the face looks quirky. Finishing teaches you how shaping, stuffing and closing work together. Repeatedly restarting teaches you mostly how to restart.
Realistic Time Expectations
A first small amigurumi toy might take an evening, a weekend or longer. That does not mean you are slow. The stitches are only part of the project. You are also learning to read a pattern, count rounds, place features, stuff evenly and close the final hole.
Take breaks if your hands feel tired or your counting starts to slip. Your second toy will usually feel much faster because the structure is familiar.
Safety Notes Before Gifting or Selling
For babies, toddlers and pets, avoid plastic safety eyes, beads, buttons and small detachable pieces. Embroider the features and sew any parts on very securely. Check the toy regularly for wear if it will be handled often.
If you plan to sell handmade toys, research toy safety and labelling rules for your country or region before listing anything. Good starting points include the US Consumer Product Safety Commission, UK toy safety guidance, Product Safety Australia and Health Canada toy safety information. Rules can vary by product, materials, age range and where you sell.
Also think about washability. A toy made for everyday cuddling should be easier to clean than a decorative piece for a shelf.
What to Make Next
Once you have finished one round creature, try another simple shape before moving to complicated limbs and colourwork. Good next projects include a tiny whale, a simple bear head, a chick, a mushroom or a small cat head keychain for adults.
Add one new skill at a time: a colour change, sewn-on ears, embroidered cheeks, then small arms or legs. That way, each project builds confidence instead of overwhelming you.
FAQ
Is amigurumi hard for complete beginners?
It can be fiddly at first, but a simple round toy uses only a few skills. The hardest parts are usually seeing the stitches, counting rounds and keeping tension even.
What yarn is best for beginner amigurumi?
A smooth, light-coloured medium-weight yarn is the easiest place to start. Cotton gives clear stitch definition, while acrylic can feel softer and more forgiving. Avoid fuzzy, plush or very dark yarn for your first project.
Do I have to use a magic ring?
No. A magic ring creates a neat centre, but you can chain 2 and work your first stitches into the second chain from the hook. It is a useful alternative while you are learning.
Are safety eyes safe for baby toys?
Plastic safety eyes are not the best choice for babies, toddlers or pets because they can become a choking hazard if they detach. Embroidered eyes are safer for toys that may be chewed, pulled or slept with.
Why can I see stuffing through my amigurumi?
The most common reasons are a hook that is too large, loose tension, overstuffing or gaps from decreases. Try a smaller hook, use invisible decreases and add stuffing more gradually.
Conclusion: Your First Amigurumi Toy Is a Learning Piece
The best mindset for amigurumi for beginners is simple: aim to finish, not to make it flawless. Choose smooth yarn, use a smaller hook, mark every round, check that the right side faces out, stuff slowly and embroider features when safety matters. Your first toy may be a little wonky, but it will teach you the structure behind almost every crochet creature you make next.
Join the conversation
Sign in — Sign in to join the conversation.