
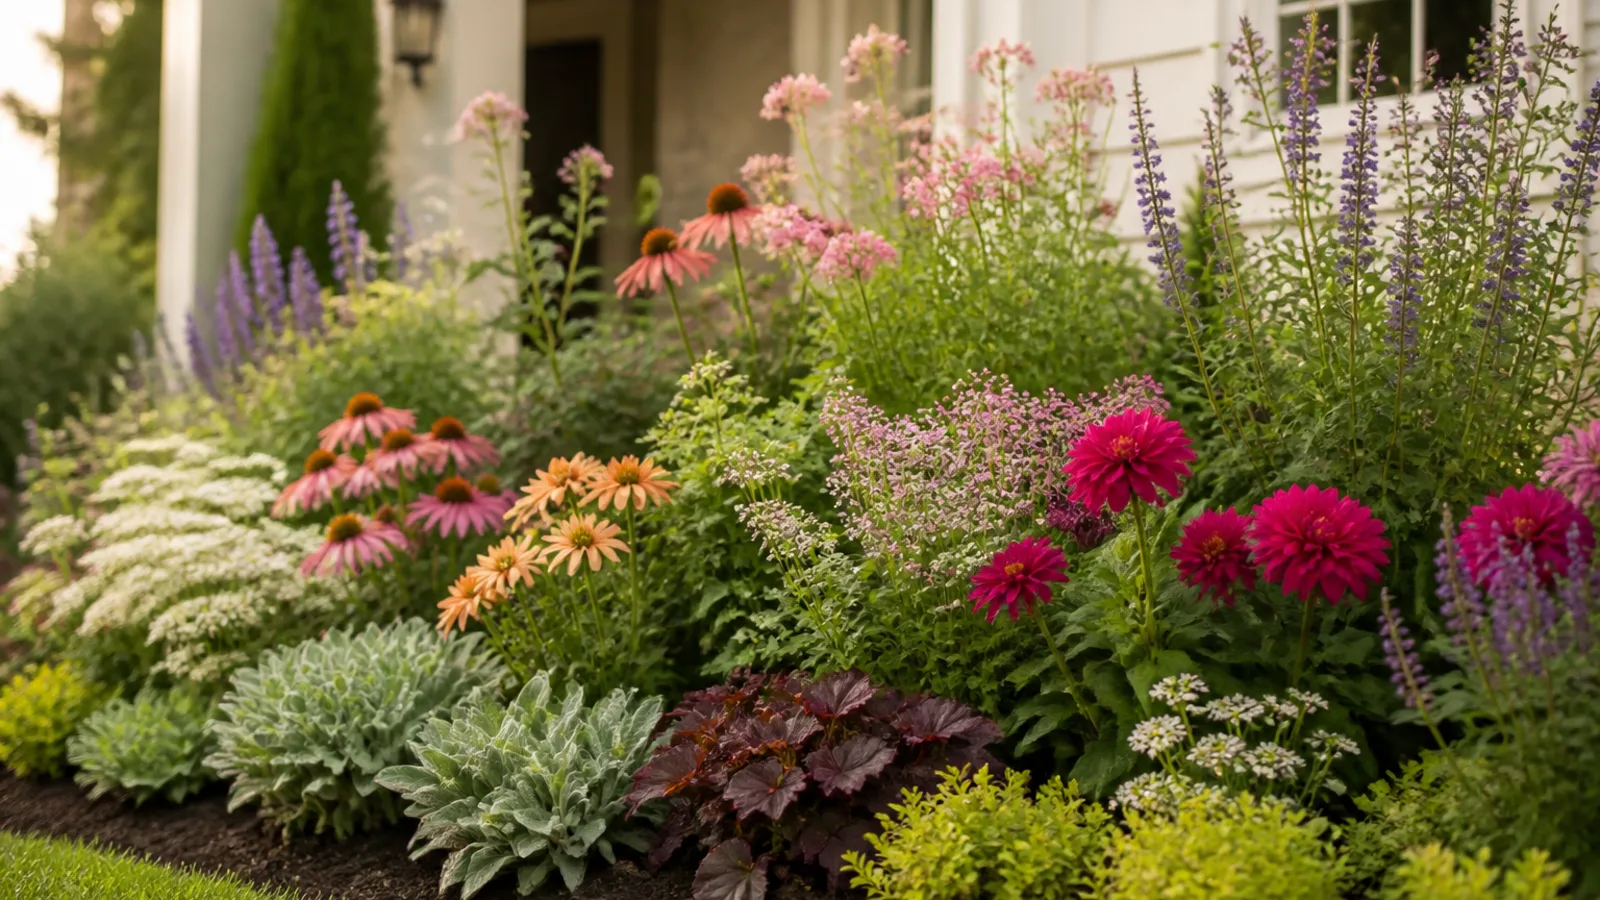
Flower bed planning is much easier when you stop thinking in terms of individual plants and start thinking in terms of shape, height, color, and timing. A bed that looks good in May but feels patchy by July usually was not designed as a whole. The good news is that you do not need advanced gardening skills to make something beautiful. You just need a simple system.
This guide walks you through a beginner-friendly way to plan a flower bed that feels intentional from the start and still looks good later in the season. The goal is not perfection. It is a bed with structure, repeat planting, and enough variety to stay interesting without becoming chaotic.
Start with the job of the bed, not the plant list
Before you buy anything, decide what the flower bed is supposed to do. A bed at the front of the house has a different job from one along a fence, around a patio, or beside a driveway. The purpose of the bed affects how tall the plants should be, how formal the design feels, and how much maintenance you are willing to take on.
For example, a border bed viewed from one side usually works best with taller plants at the back and lower plants at the front. An island bed that can be seen from all sides needs taller plants near the center so the bed has shape from every angle. A narrow strip by a path often looks best when it is kept simple, with repeated plants rather than a long list of different ones.
It also helps to think about the amount of sun the bed gets. A sunny bed can support many flowering perennials and annuals, while part-shade beds often rely more on foliage, texture, and a few reliable bloomers. The more honest you are about the site, the easier your flower bed planning becomes.
If you are new to gardening, simplicity is your friend. Repeating the same plant or two often looks more polished than mixing ten different species. A smaller palette also makes watering, pruning, and replacing plants much easier.
Measure the space and sketch the shape
A flower bed looks best when it suits the space around it. Take a few minutes to measure the length and depth of the bed, then note where it will be viewed from. A bed seen from a kitchen window should be designed differently from one that is mostly seen at eye level from the street.
You do not need a perfect landscape drawing. A rough sketch on paper is enough. Mark the edges of the bed, nearby windows, paths, fences, trees, and any spots that get more shade or wind. If you are creating the bed from scratch, use a garden hose or string to test the outline before you dig. This is especially useful for curved beds, which can look softer and more natural than straight lines, but can also become awkward if the curve is too tight.
Try to leave enough room for the plants to grow. One of the most common beginner mistakes is crowding the bed with small plants that seem sparse at first. Then, a season later, everything competes for light and air. A little empty space at planting time is usually a good sign.
A good rule of thumb is to think in groups rather than dots. Instead of one of everything, plant three to five of the same type together when possible. That repetition creates rhythm and helps the bed read as a design rather than a collection.
Build the bed in layers: tall, medium, low
The simplest way to make a flower bed look designed is to arrange it by height. This gives the eye a clear path through the planting and keeps smaller flowers from disappearing behind taller ones.
Place the tallest plants where they won’t block the view
Tall plants are the backbone of the bed. They create vertical structure even when they are not in bloom. In a border bed, place them toward the back. In an island bed, place them near the center or slightly off-center so the bed does not look too stiff.
Tall plants can be flowering perennials, ornamental grasses, shrubs, or even a few annuals with strong upright forms. The exact plant matters less than the role it plays. You want something that gives the bed height and presence.
Try not to scatter too many tall plants throughout the bed. A few strong verticals usually look better than a random mix of heights. If every plant is shouting for attention, the design gets noisy.
Use mid-height plants to carry the color
Mid-height plants make up the main body of the bed. These are often the flowers people notice first because they sit at a comfortable viewing height. They should do a lot of the work: adding color, filling space, and linking the taller and lower plants together.
This is where repetition helps most. Use one or two dependable plants in several places rather than one plant each of many varieties. Repetition gives the bed flow. It also makes the planting feel intentional, even if the palette is simple.
Mid-height plants are also where foliage matters. A plant with attractive leaves can keep the bed looking full when flowers are fading. If you want your bed to hold up across the season, do not judge plants by bloom alone.
Finish with low plants and edging
The front edge of the bed is what makes it feel finished. Low plants soften the border, hide bare soil, and create a transition between the garden and the lawn, path, or patio.
Low-growing perennials, small annuals, or groundcovers can work well here. In some designs, a tidy edging plant is enough. In others, a wider band of lower flowers creates a more relaxed look.
Mulch also matters. It is not just practical; it makes the bed look complete while helping with moisture retention and weed control. A neat layer of mulch can make even a young planting look more polished.
Plan for bloom timing across the seasons
A beautiful flower bed does not need every plant to bloom at once. In fact, that is usually a mistake. If everything peaks in the same week, the bed can look wonderful briefly and then thin out quickly. Better flower bed planning spreads the interest across the season.
Think in three acts: spring, summer, and autumn. Some plants bloom early. Others hold the middle of the season. A few keep the bed interesting late in the year with flowers, seedheads, or strong foliage.
For a beginner, the easiest approach is to choose one main season and support it with plants that extend the show. For example, if you love summer color, build around plants that bloom for a long time, then add spring bloomers and late-season companions so the bed never feels empty.
It also helps to include plants with different kinds of interest. Some may bloom for a long time. Some may have striking leaves. Some may have structured seedheads in autumn. That mix is what keeps a bed looking alive when the obvious flowers are resting.
If you want to learn more about bloom succession and plant suitability in your region, trusted resources like the Royal Horticultural Society website and The Old Farmer’s Almanac garden guides can be useful starting points, though you should always match any advice to your local climate and conditions.
Before you buy plants, check your local frost dates and make sure the varieties you choose suit your region. Even a well-designed bed will struggle if the plants are not suited to the climate.
Choose a simple color palette
A limited color palette is one of the easiest ways to make a bed look cohesive. Beginners often think more colors will create more interest, but the opposite is usually true. Too many unrelated colors can make the bed feel busy and unplanned.
Start with two or three main colors, then let green do a lot of the unifying work. White, cream, and soft silver can act as connectors if you want the bed to feel calm. If you prefer a bolder look, choose one strong color and pair it with one or two softer companions so the overall effect does not become overwhelming.
Examples of calm combinations might include purple, white, and green; or blush pink, white, and silver foliage. Bolder combinations might include deep red, yellow, and dark green, though these need a little more care to keep them balanced.
One easy trick is to repeat the same color in more than one place rather than clustering all of it in one area. That helps the eye move through the bed instead of stopping at a single bright spot.
Favor plants that do more than one job
The best plants for a beginner-friendly bed are usually the ones that earn their keep in more than one way. A plant may bloom well, but it may also have good foliage, a tidy shape, or a long season of interest. Those extra qualities matter, especially if you want the bed to look good with less effort.
Look for plants that stay reasonably neat without constant trimming. If a plant flops over, spreads aggressively, or needs frequent deadheading to stay attractive, it may not be the best choice for your first bed unless you truly enjoy that kind of maintenance.
It is also worth mixing plant types when the site allows it. Perennials give structure year after year. Annuals can fill gaps and add quick color. Shrubs and ornamental grasses can provide backbone. Used together in moderation, they create a bed that feels layered and complete.
Local conditions matter here. In a dry garden, drought-tolerant plants may be the most practical. In areas with browsing wildlife, you may want to prioritize deer-resistant choices. In humid regions, disease-resistant varieties can save a lot of frustration. For climate-specific guidance, local extension services are often more useful than generic plant lists. In the US, the land-grant extension network can help you find regional advice.
Design for maintenance from the start
A flower bed only looks good all season if it is manageable. Design decisions made at the beginning can save you hours later. Spacing, mulch, access, and plant selection all affect how easy the bed is to maintain.
Give plants enough room for air to move between them. Crowded beds are harder to water evenly and more likely to develop problems. Also think about how you will reach the back of the bed if it is wide. If you cannot comfortably reach a plant, you may struggle to weed, deadhead, or cut it back later.
Mulch is one of the simplest ways to reduce maintenance. It helps hold moisture in the soil and makes weeds easier to spot. Drip irrigation or soaker hoses can also be helpful, especially in larger beds, because they deliver water more consistently than hand watering alone.
If you know you will not want to deadhead constantly, choose plants that look good even after flowering. Plants with strong seedheads or attractive foliage can keep the bed attractive long after the bloom has faded. That is especially valuable in late summer and autumn, when some gardens start to look tired.
A beginner-friendly flower bed formula you can copy
If you want a simple starting point, use a repeating three-layer formula. It is not fancy, but it works well in many gardens and can be adapted to sun or shade.
Back or center: one tall focal plant or a small group of the same upright plant. This gives the bed height and a sense of anchor.
Middle layer: two reliable flowering plants repeated in groups. These create the bulk of the color and carry the design through the season.
Front edge: one low plant or a soft edging flower repeated along the border. This finishes the bed and keeps it from feeling abrupt.
For a sunny bed, you might imagine a structure like this: a vertical grass or tall perennial for height, a pair of long-blooming perennials in the middle, and a low edging plant at the front. For part shade, you might use a small shrub or upright perennial at the back, a mid-height bloomer with good foliage in the center, and a soft groundcover along the edge.
The important part is not the exact plant names. It is the relationship between them. Tall, medium, low. Repeated, not random. Blooming across the season, not all at once.
If a flower bed looks unfinished, the problem is often not the flowers themselves. It is usually the structure around them: too many plant types, no clear height pattern, or no plan for what happens after the first bloom is over.
Common mistakes that make a flower bed look unfinished
Beginners often make the same few mistakes, and most are easy to avoid once you know what to look for.
- Planting too many different species: Variety can be lovely, but too much variety creates visual noise.
- Putting tall plants in front: This blocks smaller plants and disrupts the height pattern.
- Ignoring bloom gaps: A bed needs interest before, during, and after flowering.
- Skipping structure: Without strong shapes, the bed can feel flat when flowers are not open.
- Overcrowding: Plants may look good for a month and then struggle as they mature.
- Leaving too much bare soil: A bit of space is fine, but large empty patches make the bed feel incomplete.
- Planning for only one season: A bed that shines for two weeks and fades is disappointing.
Many of these problems come from buying plants one by one without stepping back to see the whole picture. The easiest fix is to pause and ask: what will this bed look like in spring, midsummer, and fall?
A simple step-by-step planning process
- Observe sun and soil. Watch the bed through the day and notice where the light falls.
- Decide the bed’s purpose. Is it a border, focal point, path edge, or foundation planting?
- Choose a shape. Keep it simple if you are new; curves are fine, but the outline should feel intentional.
- Pick a color palette. Limit yourself to a few colors so the bed stays cohesive.
- Choose plant heights. Plan for back, middle, and front layers.
- Map the bloom timing. Include early, mid, and late-season interest.
- Group and repeat plants. Repetition gives the design rhythm.
- Add mulch and maintenance notes. Make the bed easier to care for from day one.
If you want a fast test before buying anything, ask yourself whether the bed has a clear spine. That spine may be a repeated shrub, a tall grass, or a series of repeated perennials. Without it, the bed can feel like a collection of individual flowers instead of one design.
FAQ
How many different plants should I use in one flower bed?
For a beginner, fewer is usually better. A bed can look polished with just three to six plant types if they are repeated well. You can always add more later, but starting simple makes the design easier to manage and more cohesive.
What is the easiest flower bed layout for beginners?
The easiest layout is a layered one: tall plants at the back or center, medium plants in the middle, and low plants at the front. This structure works because it is easy to understand, visually balanced, and flexible enough to suit many garden styles.
How do I keep a flower bed looking good after the first bloom flush?
Choose plants with different bloom times, not just one short burst of flowers. Include foliage plants, repeat bloomers, and late-season interest such as seedheads or grasses. Deadheading and mulching can also help the bed stay tidy for longer.
Should I choose annuals, perennials, or a mix?
A mix is often the most useful choice. Perennials give the bed structure from year to year, while annuals can add quick color and fill gaps. If you are just starting out, a mostly perennial bed with a few annuals for support is often easiest to maintain.
How far apart should I plant flowers in a bed?
Spacing depends on the mature size of each plant, so follow the plant label or reliable regional guidance. In general, give plants enough room to grow without crowding each other. A bed that looks a little open at first is often healthier and more attractive later.
Conclusion
Good flower bed planning is less about collecting pretty plants and more about creating a clear structure that holds up through the season. When you plan for height, repetition, bloom timing, and maintenance, even a simple bed can look thoughtful and welcoming. Start small, keep the palette restrained, and choose plants that support one another. That is how beginners build a flower bed that looks good all season, not just on the day it is planted.




Join the conversation
Sign in — Sign in to join the conversation.